Showing posts with label molecular gastronomy. Show all posts

Wednesday, May 9, 2012

Cilantro Foam

Untitled
This post is part of a larger series devoted to a Molecular Gastronomy focused meal I made: Molecular Gastronomy with an Asian Twist. Other posts in this series include Spherification (making "caviar"Pho Inspired Grilled Steak with Mint, Cilantro, and LimeSweet Basil Pesto with Rice Noodles, and Bok Choy Agar Noodles

Are you tired of molecular gastronomy yet?

This is the last post in the Molecular Gastronomy with an Asian Twist series.

Today we'll talk briefly about foams.  Foam is essentially a semi-stabilized emulsion of liquid and air bubbles.   We've all seen foam in our own familiar settings, whether it be in a cappuccino, a milkshake, or whipped cream.

It's when the the flavor of the foam becomes something unconventional that people start associating it with molecular gastronomy.

Even though Ferran Adria (one of the spear headers of this modern type of cuisine) hasn't used foam for years, the trend is still quite popular at many other restaurants. It's a unique way of adding flavor to a dish without a sauce. To get a good solid foam, add a stabilizing agent such as gelatin or lechitin before mixing up your flavoring agent with a hand blender.

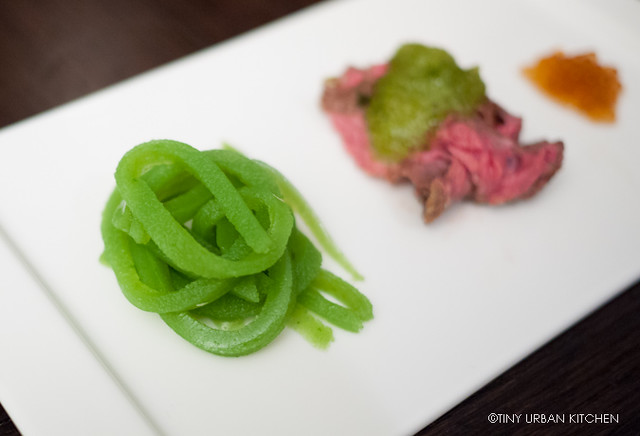
For my crazy molecular molecular gastronomy meal, I decided to make a cilantro foam (Bryan's favorite herb!) to use alongside my deconstructed Taiwanese Beef Noodle Soup dish.
Untitled
A foam is a mixture of liquid and air. In my case, since I wanted to make cilantro foam, I had to first make a liquid version of the herb. To get the maximum flavors out of the herb, I steeped cilantro in hot water for about 10 minutes before blending the mixture in the blender.

On the side, I dissolved gelatin in some water.
Untitled
Finally, I blended it with a hand blender and served on top of steak.

The foam worked out OK, although it was not as fine as the ones I have seen at restaurants. I'm not sure if it's because of the nature of my little hand blender, or whether it's because a different additive (such as lechitin) would have worked better.

I guess as I continue to learn more I will share about it! For now, this method works OK. The foam lasts about 1-2 hours, which should be fine for a dinner party. You can always create the liquid first and then just whip it up right before guests arrive.

Enjoy!

Cilantro Foam
Source: Feast

Ingredients
1 cup water
¾ cup chopped cilantro
1 pkg gelatin powder (2 tsp)
1 Tbsp cold water

Boil water in a small saucepan.  Remove from heat and pour over chopped cilantro and let sit for 15 minutes. Blend the cilantro-water mixture and pour over cheesecloth to filter out the solids. Add cold water to the gelatin package and let sit for 5 minutes. Add cilantro liquid mixture to the gelatin mixture. Whip the mixture with an immersion blender (or wire whisk!) until a foam has formed. Refrigerate, uncovered, until ready to use.

The foam will stay set for a couple hours, but will eventually start to deflate. It's best to make it soon after you plan on serving it.

Enjoy!
Untitled

Saturday, May 5, 2012

Bok Choy Agar Noodles

Untitled
This post is part of a larger series devoted to a Molecular Gastronomy focused meal I made: Molecular Gastronomy with an Asian Twist. Other posts in this series include Spherification (making "caviar"Pho Inspired Grilled Steak with Mint, Cilantro, and Lime, and Sweet Basil Pesto with Rice Noodles

Playing with molecular gastronomy is fun, although things can get a bit wacky at times.

Like these crazy bok choy "noodles," for example.

Admittedly, making my own "caviar" using spherification was by far the "nerdiest" thing I did this past weekend. Nevertheless, I would give these green noodles a close second.

Here's the back story. As part of my original proposal to Foodbuzz for this Foodbuzz 24, 24 meal, I had promised to make bok choy "noodles" as part of a larger, molecular interpretation of a deconstructed Taiwanese beef noodle soup.

Funny thing is, I really had no idea how I was going to make these. I find that I often like to invent absurd and overly ambitious meals in my head, sometimes promising to deliver them without really thinking things through.

It bites me back sometimes when my fantastic proposals actually get accepted and I have to deliver.

Thankfully, the internet is full of solutions, and my friends had given me a nice, big bag of fun powders to try.

At the end of the day, under the pressure of time, I was actually able to deliver a meal that came surprisingly close to my original proposal.
Untitled
This "deconstructed Taiwanese beef noodle soup" begins with the baby bok choy, a common vegetable used as the "green" part of a beef noodle soup. I decided to mix up the shapes and flavors, making the bok choy into a noodle instead.
Untitled
I blended up a couple small stalks of bok choy and a small shallot in some dashi broth in the blender.
Untitled
Heat up the bok choy "soup" with some agar agar, a red algae based gelatin.
Untitled
Pour out the solution into appropriately-shaped containers. Since I was trying to make noodles, I tried to put them into square containers. Let set at room temperature or in the refrigerator for at least an hour.
Untitled
Remove from containers, and slice!
Untitled
Though they look sort of like noodles, the texture is pretty different. It's kind of soft, breaks easily, and (frankly), isn't nearly as good as a real wheat-based noodle.

I think this recipe works better for making interesting vegetable "pates" or "terrines."

Nevertheless, it's a cool way to make some interesting, gluten-free noodles which incorporate any flavor you might want. I'm sure this would work with all sorts of other vegetables, such as arugula, basil, spinach, or maybe even carrots!
Untitled


Bok Choy Agar "Noodles"
Ingredients
7 oz bok choy
1 small shallot
3.2g agar agar powder
1/4 cup broth (I used dashi)
salt to taste
dash of sugar

Blend together bok choy, shallot and broth together until a fine puree forms. Heat 200g of the bok choy liquid with agar agar until boiling and agar agar is dissolved. It will become much thicker. Pour into a level, square surface up to about 1/2 inch thick and let cool for at least 1 hour.

Slice up into "noodles" and serve.
Untitled

Tuesday, May 1, 2012

Spherification (Making "Caviar")

Untitled
This post is part of a larger series devoted to a Molecular Gastronomy focused meal I made: Molecular Gastronomy with an Asian Twist

Spherification is a modern molecular gastronomy technique that was first invented at El Bulli by Ferran Adria in 2003. While visiting a company called Griffith España, Adria and his team discovered a cool Mexican sauce with little spheres floating inside. They learned from the company sodium alginate was the key ingredient used to make these spheres.

Adria and his team got some samples of the ingredient from Griffith España and started experimenting on their own. Soon they were making all different kinds of spheres with all sorts of liquids.

Armed with sodium alginate and calcium chloride, I set out to try my own hand at making some spheres.
Untitled
There are two key kinds of spherification techniques, each with its own pluses and minuses. If you're short on time (e.g., if you have only one day of prep time), the Basic Spherification technique is your only option. This technique is easier and is great for making small caviar-like balls. The biggest negative is that once the spheres form, the jellification process does not stop. This means the spheres need to be served immediately. Otherwise, over time,  the balls will cease to be filled with liquid, instead becoming solid, gelatinous balls. Furthermore, this method does not work as well for acidic liquids.

Reverse Spherification is a more complicated technique which requires a few days advance preparation. Instead of mixing your "stuff" with sodium alginate and adding to a calcium chloride bath, you add your "stuff" to a sodium alginate bath (thus reverse spherification). The biggest benefit is that the jellification process stops upon formation of the balls (the gel is only the outer shell, not mixed into the inner liquid), which means you can store the caviar for longer periods of time before serving.

Additionally, this method is not as sensitive to acidic liquids, giving you much more freedom in the types of pearls you can make (virtually anything!). The biggest downside is that you had to let the sodium alginate bath rest for 24-28 hours (to remove air bubbles) before you can use it.
Untitled
Today I will only be describing the basic spherification technique.

The first step in making spheres is the dissolution of sodium alginate in water. Sodium alginate is not very soluble in water, so it will taking plenty of agitation in order to get it to dissolve. I used an immersion blender and probably stood there for a good 5-10 minutes before the solid completely dissolved.
Untitled
Once in solution, bring the mixture to a boil over high heat. When it reaches a boil, remove from heat and let cool to room temperature.

Meanwhile, in a separate bowl, dissolve the calcium chloride in water (this is quite easily done).
Untitled
Now is the fun part! You have your two basic starting materials and the rest is up to your creativity. Essentially, mix the sodium alginate with whatever liquid you want at a roughly 2:3 ratio v/v (liquid: sodium alginate solution). You will need to experiment a bit to get the right ratio. Certain liquids were more viscous than others and I had a harder time forming good spheres sometimes.
Untitled
Since I was mainly experimenting, I would just use a spoon and mix a small volume (like 3 mL) of a liquid (e.g., wine, juice, or sauce) with a slightly smaller volume (like 2 mL) of the sodium alginate solution. I would then use the syringe to suck up the liquid and slowly drip my mixture calcium chloride bath.
Untitled
It was like magic! Instead of dispersing, the drips would solidify into little bubbles. It was so pretty.
Untitled
Ha ha, I know these matcha balls kind of look like peas. That's what happens if you use a pretty thick liquid on the inside (matcha powder does not dissolve easily in water!)
Untitled
I played around and made all sorts of different kind of spheres.

Typically, the less viscous the liquid, the better the shape of the spheres.
Untitled
Isn't this gorgeous? I made some spheres out of red wine.

Notes on Spherification
Certain types of liquids don't work super well with this recipe. For example, if your liquid is too acidic, it won't form proper balls. One way to address this is to add sodium citrate to your sodium alginate solution to bring down the acidity of your liquid. I haven't personally tried this, but apparently sodium citrate is a bit tart and salty, so adding a bit too much could affect the flavor of your final product.

We did notice that really complex flavors were significantly affected by the chemical reactions involved. Our spherified red wine (Chateau Le Tour Carnet) lost its characteristic deep tannins and instead became much more fruity and light. The Cabernet part of the blend seemed to disappear while the Merlot portion became more pronounced.
Untitled
Spherified scotch whisky lost a lot of its sweet and floral notes yet maintained a strong "peaty" characteristic.

My guess is that fruity, less complex wines and drinks in general would work really well with this technique.

Enjoy!

Spherification

Sodium Alginate Bath
3g sodium alginate
325g water

Calcium Chloride Bath
5g calcium chloride
1000g (1 L) water

Syringe
liquid of choice (200 mL)

Dissolve sodium alginate in water, using an immersion blender to get the powder in solution (could take 5-10 minutes). In a pot, bring the solution to a boil and then let cool to room temperature. In a separate bowl, dissolve the calcium chloride in water.

In a small bowl, mix together your liquid of choice with the sodium alginate solution in a roughly 2:3 v/v ratio (liquid of choice: sodium alginate solution). Using a pipette or syringe, gently squeeze the liquid out drop by drop into the calcium chloride bath. Small spheres will form. Let the spheres "cook" for about 1 minute before removing them from the bath using a slotted spoon. Rinse with water before serving.

Serve immediately.

Note: you can continue to reuse the calcium chloride bath as you mix together portions of the sodium alginate bath with various different kinds of liquids. Have fun!
Untitled