
It's dangerous to have these mochi cakes lying around the house at midnight while I'm blogging. Maybe it's their addictive chewy texture. Or the deliciously sweet red beans strewn throughout the cake. Or maybe I secretly think it's low fat, so it's OK to eat at night.
Whatever it is, I can't just have one. In fact, I can hardly keep from eating the entire loaf. It doesn't help that I love red beans and anything made with mochi flour.
Mochi cake (or "nian gao" 年糕 as it is called in mandarin) is a classic dessert that is especially popular during Chinese New Year. The term "nian gao" sort of has a double (or even quadruple) meaning in Chinese. In Chinese, the pronunciation "nian" sounds like the word for year (年)and sticky (粘). The word "gao" sound like the word for cake (糕) but also sounds like tall or high (高).
You can imagine the combinations: New Year cake! Sticky cake! Reaching higher with the New Year! Sticky tall! (ok, that last one doesn't make that much sense). But you get the point. This dessert is popular during the New Year because it symbolizes all these wonderful ideas about wishing each other good health and fortune. Chinese people love those double meanings.
Traditional Chinese new year cake is steamed. This version has been modified for the Western kitchen - it's baked in an oven! I personally like this version better, as it has a nice browned crust that doesn't exist in the steamed version. The best part? This simple recipe has a short ingredient list and only takes 10 minutes to prepare.

This recipe is really really flexible. In fact, you don't even have to add red bean. You can add something else if you like (ha ha, I once even tried coffee! yes, I love coffee). And if you do add red bean paste, you can add as much or as little as you want. I only added 3/4 of a cup, but some people like to add an entire can! It's really up to you.
The sugar amount is also flexible, depending on your sweetness tolerance. I recently made it with 1 1/4 cup sugar, which I personally though was plenty sweet enough.

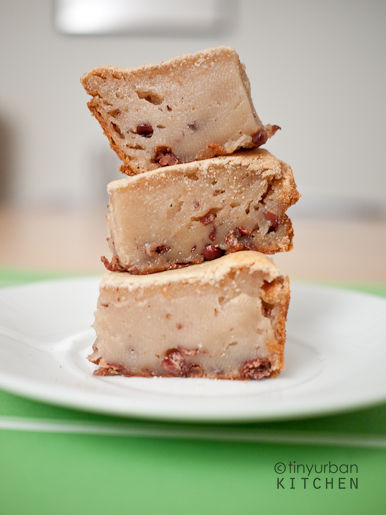
Red Bean Mochi Cake
prep time 10 | minutes bake time 1 hr | makes 2 loafs
1 lb sweet/glutinous rice flour (e.g., Mochiko, the bag with the green text in those Asian stores)
3 eggs
1/3 cup vegetable oil
2 cups milk (or water)
1 to 1 1/2 cups of sugar
1/2 - 1 cup red bean paste
Mix together all the ingredients except the red bean paste. Stir in the red bean paste. Bak at 350 degrees in a 9 x 13 pan or 2 loaf pans for 45 min - 1 hour. Cake is done when you can insert a knife cleanly.

Slice it up! And enjoy! This tastes great warm or at room temperature. At room temperature it has more of that characteristic chewiness. When it's warm, it's a bit softer and slightly gooey. I love toasting it in the toaster oven in the morning. The inside gets nice and warm and the edge gets nicely toasted.

Happy Chinese New Year!
I love nian gao. This looks very delicious with red bean paste. I would love to try this. Thanks for sharing.
ReplyDeleteHow would you steam them?
ReplyDeleteWow this is easy. I'll have to make it the next time I pick up a can of an!!
ReplyDeleteMade your truffle oil roasted cauliflower the other night. Tasty :)
Beautiful! Yes, my mom does baked versions of sweet rice cakes, just because it's easier, but it's no less addicting! What a wonderful treat to have in the comforts of your own kitchen! :D
ReplyDeleteI love red bean nian gao! my mom usually fries it in pans so its crispy on the outside, soft sticky on the inside... =)
ReplyDeleteLooks so good! Can you make the mochi with other fruits or flavors?
ReplyDeleteWow your concept of the blog is my current kitchen at the mo (and the icon looks it pretty much!). Gorgeous looking nian gao. Might try this and steam it. Yum. x
ReplyDeleteAck! I was going do a baked nian gao recipe post too! *quivers at the thought of dueling recipe posts with Jen and TUK*
ReplyDeleteBaked is great since it's supereasy, but I'm with "andthisblog" on the steamed and then pan-fried nian gao. So gooey and good. For the steamed version, the wikihow recipe seems a little off (not enough water.) I think you can just follow Jen's recipe, and take out the eggs, replace the milk with water, and the white sugar with brown sugar. And remember to coat the slices with an egg/flour/water batter before frying!
Steamed Nian Gao
Recipe 1 Recipe 2
This is my FAVORITE!!! I used to make it all the freaking time. I love it pan-fried with a bit of oil, to get the outside nice and crispy, and the inside nice and gooey!
ReplyDeleteI actually baked mine, though, with a bit of baking soda.
high low - I have never tried making it with fruits, but definitely feel free to experiment. I think the traditional Chinese rice cake actually has various dried fruits in it. And like I said in the post, I once tried coffee!
ReplyDeleteand this blog - yes! I love the traditional way with eggs and pan fried too! Nice and gooey!
hermyt - thanks for the links. I've actually never tried it steamed.
Yum! I love baked nian gao--we usually make a coconut one for the new year (I am eating some right now!) along with the traditional brown sugar steamed kind (with red dates)--except we make it in the microwave! Will definitely have to try the red bean variation :D
ReplyDeleteYum. The perfect thing to use up a cup of leftover red bean paste! My housemates were weirded out by the texture -- "like muffins, only more so" -- then scarfed them up.
ReplyDeleteThat red bean mochi cake looks so good!
ReplyDeleteThis looks delicious-and who knew that it was so easy to make?! Can't wait to give this a try!
ReplyDeleteMy mom makes this back at home, and I left without the recipe so when I googled 'red bean nian go' i found your blog, which is beautiful, btw! i have two pans in the oven right now, except i substituted the milk for coconut milk mmm!
ReplyDeletethanks for the recipe! :)
- sharon (not jessica stewart)